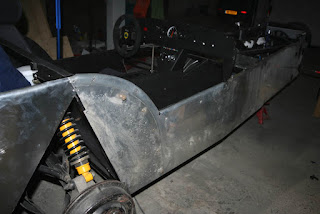
What you will find here: Intended to display minor modifications to my Westfield SEi, this blog now witnesses the two year rebuild (and more) after a major crash in October 2011. Have fun and feel free to add a comment at the end of any post.
Best viewed with Firefox

Pages

Saturday, June 30, 2012

Centre console in leather

It took even more time to cover the centre console, although it's smaller. The result looks ok but the chrome ring around the LUCAS switch is not large enough to cover the uneven cut I made. I painted the aluminium black where it appeared but will look for a larger ring.
Centre console in situ.
Inner panel fixed with black rivets, passenger's side now almost finished.
Inner and outer panel are fixed with the same rivets, so I had to mount both. The panel looks awful in this photo and I hope I can get it shiny again when I finish the car.
New Corbeau Clubman seat vs. old. Those are very narrow (38cm), but the backrest lever has to be modified to make them fit, such small is the old Westfield chassis.
Cheers.

Wednesday, June 27, 2012

Dashboard in leather

Cut a piece of patent leather to approximate size.
Special glue ...
... applied to both sides.
Then I applied Sicaflex to the frame and mounted the dashboard.
Hammered the aluminium panel around the lower rail, then glued the leather to prevent it from getting lose when climbing in and out of the car.
Used a sharp cutter to get rid of the leather covering the holes, then mounted the dials and switches.
General view of the dashboard, centre console is next.
Cheers.

Sunday, June 24, 2012

Shiny

Next thing to do is cover the dashboard and centre console in patent leather, so everything out again and a little sanding to give a good surface to the glue.
The old school Lucas switch is a PLC5 and delivery does not include how to wire it. Multimeter out and here we go.
Cheers.

Saturday, June 23, 2012

3D bending

3D bending without a sheet metal bender ...
... and the result: a centre console!
Old school Lucas ignition & light switch and Smith watch.
General view now with big red warning light for low oil pressure fitted.
Cheers.

Dashboard

After the tunnel cover was readily bent and the openings for the handbrake lever and gear lever were cut, I covered it with fleece just like some of the other inner panels.
Then it was time to bent some more aluminium panel and cut some big holes.
The final bending was done in the car. The holes for the switchgear have been drilled in situ to avoid them fouling the chassis rails.
Cheers.

Monday, June 18, 2012

Quick shift

Most people driving a Seven-type car opt for a quicker gear change mechanism. Less travel means that the pivot point has to be altered. A simple graph shows what this means. For a given movement of the x-axis, the pivot point must be higher if you want a shorter y-axis. 
It's possible to build such a lever or to modify the existing one. The Quaife lever is a very neat and well engineered solution including a proper spring operated reverse lock rather then the original rubber bellow. There are different types, short, straight, bent ... for different gearboxes.
Cheers.

Saturday, June 16, 2012

In the middle

Wanting a tougher middle cover, I bent a new one out of 2mm aluminium. Openings for gearlever and handbrake lever prepared.
Cut out and trial fit. It will be covered with fleece like the other inner panels and then bolt in place for easy removal to access the handbrake setting bolt.
Cheers.

Friday, June 15, 2012

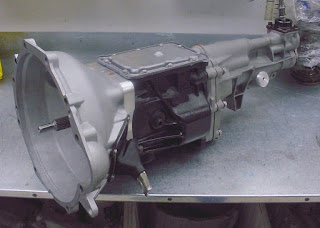
Ford gearbox type 9 (T9)

The commonly known as T9 gearbox from Ford has been produced for quite some time and can be found in lots of different cars. In this post, I will try to collect as much information as possible about this specific gearbox because it is very often used in kitcars or for 5-speed conversions. As I only started collecting, this post will be updated during the next weeks. So if you haven't found yet what you're looking for, come back some time later and check. On the other hand, if you have information not yet displayed, please let me know by adding a comment or sending an email (the one in my profile).
If possible, I will post links to existing documents and post pictures I took myself or I found on the internet. If there are any copyright violations, drop a message and I will delete the concerned file.

Reading list:
(watch out for more links hidden further in this post)
For a start, I found this lovely sketch explaining the different cases. (updated June 15, 2012)
Ford manual in german available here. (updated June 16, 2012) size=10M
Complete chapter 6 in english here. (updated June 16, 2012) size=33M
Interesting article from an old magazine (source unknown, author Jeff Mann) provided by Frank, a keen poster from the german Seven-IG forum. He provided me with lots of information about the T9. Frank, if you read this, thank you very much! Here's the article. (updated June 22, 2012)
And a dedicated webpage: http://www.type9gearbox.co.uk/

From the inside:
Sizes and dimensions:
Quick shift:
Most people driving a Seven-type car opt for a quicker gear change mechanism. Less travel means that the pivot point has to be altered. A simple graph shows what this means. For a given movement of the x-axis, the pivot point must be higher if you want a shorter y-axis. 
It's possible to build such a lever or to modify the existing one. The Quaife lever is a very neat and well engineered solution including a proper spring operated reverse lock rather then the original rubber bellow. There are different types, short, straight, bent ... for different gearboxes.
The bent lever is often used to prevent coliding with the dashboard. Another solution is to mount an extension system as above which works very fine. It is mounted where the gear lever originally sticks out of the gearbox and puts it back around 12cm. People sometimes lose that little black plastic saddle and wonder why changing gears is less precise. So keep an eye on it when you opt for changes to the original set-up. You still need it and at 5.-£ it's not cheap for a little plastic thingy.
You can buy the extension system or build it like the one from Avon.(updated June 22, 2012)

 
At some point when putting the engine & gearbox out of the chassis, the lot has to be tilted upwards and some of the gearbox oil is spilled. Prior to close all the holes around the chassis (a.k.a. as fitting the body panels) the oil has to be filled to the right level again. When leaving the factory, those 'boxes get filled for lifetime which means that there is no filling plug above and no draining plug underneath. If needed, the oil is filled via above shown plug until it spills out again. A more elegant way is to fit a plug into the top cover. Some search gave SAE75W-90GL4 as the right viscosity.

Cheers.

Sunday, June 10, 2012

Passenger's side

Some more inner panels mounted today. As I still want to access the pedals, I opted to continue on the passenger's side.
Detail shot of passenger's legroom, now finished. Lots and lots of rivets in difficult to reach locations, it doesn't look like a lot of work, but quite a few hours went into the inner panels.
After cleaning, modifying and reinforcing the old cover of the transmission tunnel, I wasn't satisfied with the result. When bending the aluminium panel for the new cover, the wooden board of my selfmade workbench cracked on it's whole length. I decided to call it a day ...
Cheers.

Sunday, June 3, 2012

JPE

Caterham built a JPE version of the Seven named after the racing driver Jonathan Palmer. The E stands for Evolution (more knowledge available here JPE register ). Some say, the ultimate Seven:
Special features: Dymag magnesium wheels, aeroscreen, carbon fibre race seats, yellow cam cover, yellow faced gauges
Engine: Swindon Racing Engines (SRE) supplied 2.0 Vauxhall
Maximum power: 250bhp @ 7750rpm
Max torque: 186lbs ft @ 6250rpm
Gearbox: Quaife 5 speed straight cut
Brakes: 10" ventilated front with four-pot callipers, 9" solid rear
Weight: 530kg
While I'm not the lucky owner of a 1:1, this little Kyosho model looks very good.
CATERHAM SUPER SEVEN JPE 1:43 (Silver Carbon) No.03156C
Cheers.

Legroom

A tight fit near the throttle pedal, but still enough place to mount a cover allowing to access the gearbox oil filler plug. It's a bit tricky to mount the panel with the pedalbox in place, I had to unmount the throttle.
A lot easier on the right side ... looks good with black rivets.
A serious alternative to Lego ... give your kids rivets, clamps, some sheets of aluminium, and if they want to get dirty (well, they do), a Sicaflex cartridge! Pic shows the preparation of the transmission tunnel cover.
Cheers.