Finally ... after much trying and preparation, I manufactured the rear body panel.
From top: first bend, preparing second bend, second bend, cutting the edges, front & rear view.
Starting from a 200x100cm aluminium panel 1,5mm thick, I cut a piece of 200x60cm. The bends are 79cm distant which leaves some sheet to be cut. The panel now has to be adapted to the chassis. This means cutting it to it's precise shape, riveting and bonding it to the rails and then bending the top over the top rail.
Cheers.
Pages
Saturday, May 12, 2012
Oil temperature sensor
As described below, one of the plates of the new oilpump will be used to plug the oil temperature sensor in. This is a Stack sensor (ST764) and it will be electrically connected to the Stack dash.
Cheers.
Cheers.
Friday, May 11, 2012
Oilpump knowledge
More oilpump knowledge thanks to 'supernono' (that's his nick in the french sevener forum) who had the sump off his engine and had a look for me where all the lines and channels go from and come to the pump. Valuable details I thankfully add to my blog to share with everybody interested.
The Pace wet sump oilpump has two blanking plates. Those plates can be replaced by connectors to loop in an oil cooler. As I want to run the engine without such a cooler, I can use one of the plates to mount the oil temperature sender for the Stack gauge. The thread is 1/8x27 NPT and is easily cut into the aluminium. You may notice that the fitting is not in the middle of the plate. This is due to the channel inside the pump having a slight angle.
Cheers.
Wednesday, May 9, 2012
Oilpump résumé
After my initial hesitation about the new oilpump, I decided to further dig the subject. Surfing the web and reading lots of forum threads, one thing became clear: there are a lot of different pumps "out there". The engine in my car being a X-flow, you must know that there was the pre-xflow as well. Then there are the original Ford pumps, side-driven with or without angle. To add to the confusion, you can also find front-driven pumps, separate or integrated into the engine front cover. And to top it off, you can choose between dry sump and wet sump systems with according pumps.
Search criteria for me were 'side-driven' and 'wet sump'. I found three different pumps, but there might be more. A lot of small specialized companies developed and build their own. Since this engine has been on the market for several decades, there are a lot of different pumps both old and new.
Ford Burman Oil Pump (used, 50.-£ at Historic Racing)
Neil Bold Filter Type Pump (around 335.-£ + VAT at Historic Racing)
Pace DSP5 (around 250.-£ including VAT at Burton Power)
For the techies amongst you ...
... and finally, this one I really adore. The guys at Throbnozzle Racing apparently sent this to Pace to explain what kind of pump they imagined best for the Ford Kent X-flow.
Cheers.
Monday, May 7, 2012
Engine mount mod
The Pace oil pump has connector plates to allow the use of an oil cooler without the need of a sandwich plate. Unfortunately on my car, the upper plate collidse with the engine mount.
This meant, lifting the engine, unmount the bracket, saw, file, try, saw, file, try ... until there was enough place to mount the pump. Later, I will use one of the plates to connect the oil temperature sensor.
The Monza fuel filler mounted for good. The rising fuel price calls for a lockable insert.
Cheers.
This meant, lifting the engine, unmount the bracket, saw, file, try, saw, file, try ... until there was enough place to mount the pump. Later, I will use one of the plates to connect the oil temperature sensor.
The Monza fuel filler mounted for good. The rising fuel price calls for a lockable insert.
Cheers.
Labels:
Fuel filler,
Oilpump
Sunday, May 6, 2012
Oilpump vs. oilpump
Pic shows the new Pace oilpump (left) and the old oilpump to compare. While the bolt pattern is the same, the internals are slightly different. I will post this pic in some of the forums prior to mount the new pump to be sure it suits my engine. Additionally, the new pump falls foul with the engine mount. But this is the lesser problem because I can modify it.
Oilpump connections on the engine will have to coincide with those of the new pump.
Upper left is the pickup hole (large) and right to it is the pressure hole (small). The other hole on the right will be blanked by the pump.
In case the brownies would decide to assemble the car one night, the battery should be ready, shouldn't it. This is a loading device you can leave on to take care of the battery by controlling the load and maintaining it.
Cheers.
Saturday, May 5, 2012
Carbs
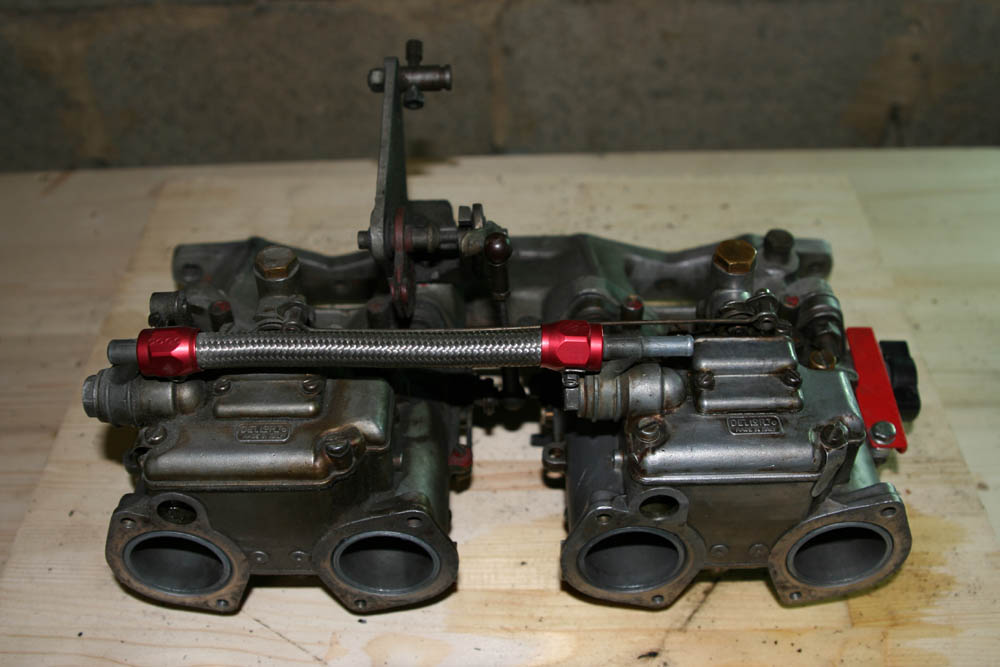
The carburettors are twin 40mm Dellortos (Italy). Although less
desirable than comparable Weber items, lots of cars were originally
equipped with. They have been used as an upgrade as well. The engine in
my car came probably out of a Ford Cortina with only one 32 or 36mm
carb. With twin 40's, the increase in power is quite important.
Road dirt + workshop dirt made them look like this ...
One hour and a lot of brake cleaner later, the right side starts to shine again ...
It is possible to make them look like new, but the planned switch to electronic fuel injection makes this a waste of time. I will clean them good enough, that's all.Tank breather installed as well. The thread on the tank being 9/16x18 and on the breather 12x1,5, I had to manufacture an adaptor with my lathe. Job done.
Cheers.
Labels:
Carbs,
Tank breather
Monday, April 30, 2012
Best radius found
After two trial bends, I found the best compromise between the jig radius and the flip back response of the aluminium panel (8cm). Therefore, I reduced the radius of the jig in two steps.
Quick and dirty trial fit just to get it in my mind that it's feasable.
Inside view near the filler.
Next time I will bend the opposite corner and then decide wether I will keep this panel or bend a new one. With two millimeters it's a little thicker (and heavier) than the original panel. And with all the trials and handling, there are some minor dents in it. So maybe the final version will be 1 or 1,5mm and hopefully with less scratches.
And an easy one to finish the day with some plumbing work. This is the high pressure pre pump filter which fits between the surge tank and the high pressure fuel pump.
Cheers.
Labels:
Bodywork,
Fuel filter,
Fuel pump
Saturday, April 28, 2012
Wooden jig
The bet was that if I wanted to mount the Monza fuel filler, I had to change the rear body panel as well. I could leave it where it is, but with two fuel fillers (one functional and one kept in place only to evitate having a hole in the panel), looks would have been spoiled. The aluminium panel (2mm thick) must be bent left and right. To have a chance to realize a somewhat decent bend, I manufactured a wooden jig.
The jig was then fixed on top of the panel. This is version one, the radius has been changed since to achieve the right bend ...
... but the principle of work is the same. While reducing the radius more and more and everytime checking the fit on the car, I hope to achieve the best possible fit. This is all new stuff to me and it is a lot of fun to find out how to proceed. If I fail, I can always revert to the original undamaged panel. Of course, I hope that I will be able to finish my very first selfmade body-panel.
Cheers.
Monday, April 23, 2012
The way to Monza
Nothing compares to professional craftsmanship. Shown here with a hose made to my specs to connect the differential housing with the breather. In this case, it is a recycled brake fluid reservoir.
Remember those posh brake fluid reservoirs from CNC? Now they are coupled with the brake master cylinders. Again with bespoke hose made to my specs from the same shop.
This filler is called "Monza". I like it's classic looks. As described earlier, I hope to be able to add it to my car. Tonight I welded a handmade bracket to the chassis and mounted it for trial just above the tank. Difficult to deduce how it will look in the end, but I'm confident that it will add even more classic touch.
Cheers.
Remember those posh brake fluid reservoirs from CNC? Now they are coupled with the brake master cylinders. Again with bespoke hose made to my specs from the same shop.
This filler is called "Monza". I like it's classic looks. As described earlier, I hope to be able to add it to my car. Tonight I welded a handmade bracket to the chassis and mounted it for trial just above the tank. Difficult to deduce how it will look in the end, but I'm confident that it will add even more classic touch.
Cheers.
Sunday, April 22, 2012
Fuel lines, tank, LP pump
Finally a good way to fix the two fuel lines and a satisfactory routing. A job easier done when the car is dismantled, but still a lot of work.
Routing near the differential housing, this connector will be connected to the low pressure fuel pump via a low pressure filter.
Up front, the fuel lines arrive near the bulkhead opening.
- Left: fuel return line
- Right: fuel supply going to the surge fuel tank and then to the high pressure fuel pump (via a HP filter)
LP fuel pump and differential breather mounted.
Fuel tank in place again, filler cut, cap on vent connector and bent connector to receive the fuel return line.
Monza fuel filler cap ... very beautiful. For the moment I have two options: stay with the original filler which means kneeling behind the car at the petrol station or mount this posh filler and fill the tank like a homo sapiens. The latter means some more mods and a new body panel for the back. I may try the second option with still in mind that I can switch back to the original design if I fail.
Cheers.
Routing near the differential housing, this connector will be connected to the low pressure fuel pump via a low pressure filter.
Up front, the fuel lines arrive near the bulkhead opening.
- Left: fuel return line
- Right: fuel supply going to the surge fuel tank and then to the high pressure fuel pump (via a HP filter)
LP fuel pump and differential breather mounted.
Fuel tank in place again, filler cut, cap on vent connector and bent connector to receive the fuel return line.
Monza fuel filler cap ... very beautiful. For the moment I have two options: stay with the original filler which means kneeling behind the car at the petrol station or mount this posh filler and fill the tank like a homo sapiens. The latter means some more mods and a new body panel for the back. I may try the second option with still in mind that I can switch back to the original design if I fail.
Cheers.
Labels:
Fuel lines,
Fuel pump,
Fuel tank
Wednesday, April 18, 2012
Fuel tank (almost) ready
Back from the welder. The fuel lines will be made out of 8mm aluminium tubing. The goal is to find the best routing for both lines avoiding too much bends and ending in a suitable position for the connections. As for the filler, I'm currently looking for the best way to fit a classic Monza type filler instead of the aero-style originally fitted. The latter is a real pain in the @ss.
Fuel outlet now features a JIC connector instead of a simple hose type and will be connected with a flexible line to the aluminium tube.
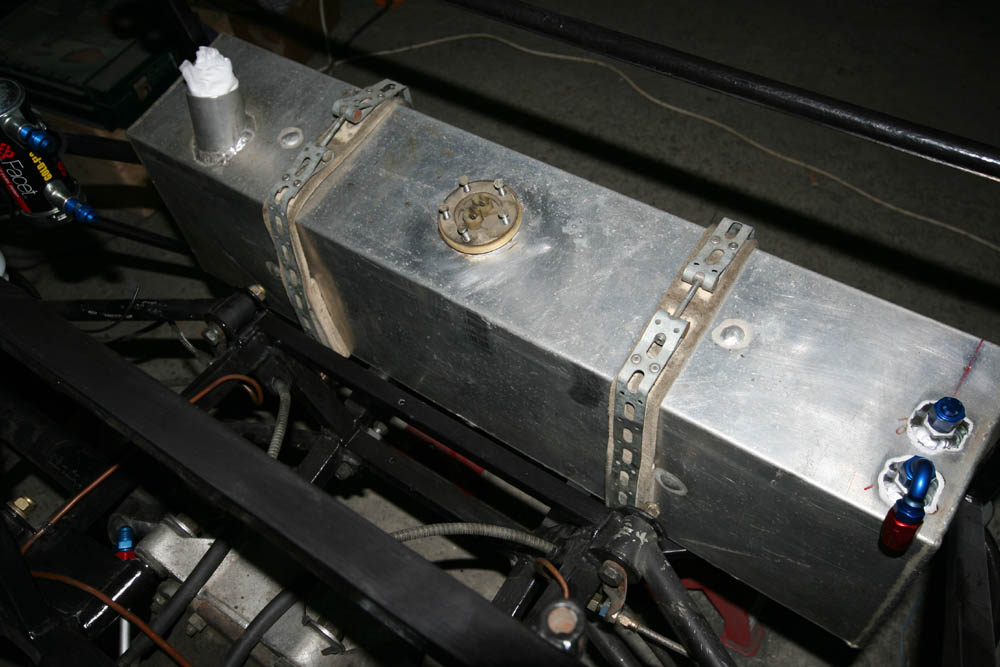
The same JIC connectors for the fuel return line and additionally for a vent if it should show that one is needed. If not, a cap will close the connector. Ventilation through the filler should be ok but the possibility of an additional vent is given. Easier to plan it now than to put the tank out again later.
Cheers.
Fuel outlet now features a JIC connector instead of a simple hose type and will be connected with a flexible line to the aluminium tube.
The same JIC connectors for the fuel return line and additionally for a vent if it should show that one is needed. If not, a cap will close the connector. Ventilation through the filler should be ok but the possibility of an additional vent is given. Easier to plan it now than to put the tank out again later.
Cheers.
Sunday, April 15, 2012
Rear brake pipe
The original brake line going to the rear drums was a little bit too short, so it had to be redone. After a few hours of bending, from underneath and above the car, adding the connectors ... here we go.
Alongside the gearbox and then it disappears around the clutch, connected to the brake master cylinder. Brake pipe bending is not my forte and some of the bends have to be revisited.
Quite a frustrating result after three and a half hours of labour ... I had to mount those posh brake fluid reservoirs to make me happy again.
Cheers.
Alongside the gearbox and then it disappears around the clutch, connected to the brake master cylinder. Brake pipe bending is not my forte and some of the bends have to be revisited.
Quite a frustrating result after three and a half hours of labour ... I had to mount those posh brake fluid reservoirs to make me happy again.
Cheers.
Thursday, April 12, 2012
Fuel tank preparation
Today we prepared the fuel tank for some mods. I want this to be done by a professional welder to avoid any risks. On top, two JIC fittings will be added, one for the fuel return line once converted to injection. The second is foreseen to install an optional vent if needed.
Underneath, the fuel outlet will be modified to connect via the same JIC fitting type.
Almost all the piping will be realized with this type of connectors (on the left for welding, on the right the hose type).
Cheers.
Underneath, the fuel outlet will be modified to connect via the same JIC fitting type.
Almost all the piping will be realized with this type of connectors (on the left for welding, on the right the hose type).
Cheers.
Subscribe to:
Posts (Atom)