Some of the bolts of the oilpan are only accessible with the startermotor unmounted. This allows me to write down the part number and clean it thoroughly. This starter motor composes of two parts, one is the motor itself which engages into the flywheel, the smaller part is the solenoid switch. The other pic shows the mounting position and some of the flywheel teeth. Starter motor back on now ... still some small jobs can be done while waiting for the cylinder head return from the workshop.
Cheers.
Pages
Wednesday, July 17, 2013
Saturday, July 13, 2013
Cleaning the valves
The cylinder head and one of the valves are at ANG for a new lease of life. Their verdict was quite ok, so I left everything there for them to do some work on the valve gear:
- the crack is not critical, there is enough space around for the gasket to keep it sealed
- the seats are not for lead-free and don't have a three-angle cut
- the copper insert that came out is a K-Liner and they don't like them at ANG (neither do I)
I decided to go for new guides instead of fumbling around with K-Liners, and new seats. Today I cleaned all the valves, springs, retainers and cotters to bring them to their workshop on Monday.
Cheers.
Tuesday, July 9, 2013
Headwork
The cylinderhead showed some leakage around the valves when I tested it with petrol. One good reason to take the valves out and regrind them. Tonight's job: disassemble the cylinderhead. Say hello to my new tool, the valve spring compressor.
This tool permits to compress the valve spring. Then you get access to the cotters and can take them out. Release the spring and the valve spring retainer comes off. The valves come out, some by themselves, some need a little persuasion.
The valves should not mix up, cardboard helps to keep them sorted. Unfortunately, one copper insert came out with its valve. Tapping it back in didn't work.
This leaves me with two more problems: #1 getting an insert off the right size and #2 find the right valve stem seals. Those in the seal kit (left) aren't the same as in my engine.
And one more to prepare a sleepless night, how about this little crack? Is this serious? I will further investigate with some specialist friends and decide what to do.
Cheers.
Labels:
Cylinder head,
Valves
Wednesday, July 3, 2013
From the bottom
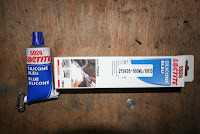
Oil pan cleaned meticulously to permit a good contact surface with the gasket. Silicon will be applied to the block surface, Loctite 5926 recommended.
Don't forget to tighten the con rod bolts with the torque wrench (48Nm) before you put the pan back on. Quite a lot of bolts. Tighten evenly to prevent it from bending.
The kit FP716K from Burton contains the gaskets you need. I replaced the pan gasket and the two half circles front and back.
Cheers.
Monday, July 1, 2013
Start of engine re-assembly
Here we go: new piston and old conrod, determine the right mounting direction through the arrow in the casting (pointing to front of engine). Lubricate pin ...
... and put it in, secure it with circlips both sides.
Number one ready ... and then repeat it for all of them.
Honing the cylinders to roughen the surface, then set the piston rings as shown.
Rings will not enter the cylinder without a ring compressor.
Tap them in with a wooden stick, repeat this four times.
Cheers.
Labels:
piston rings,
Pistons
Subscribe to:
Posts (Atom)


