Frame prepared to receive the pedalbox, the two lower patches will be drilled and threaded.
Strenghtening where the seatrails will be mounted (back there where the weight applies).
Rather than to bolt in a subframe, brackets for the diff breather and the low pressure fuel pump.
Just a little paint on some steel rails... but very important for me: the real start of the build-up.
From today on, the build-up begins. After the add of more brackets, the first coat of primer is on the front part of the chassis (2/3rd). The rear soon will get it's final sanding and primer, then the whole chassis will once again be rubbed with Scotchbrite. I will decide according to the result wether I will then put the chassis paint or a second layer of primer.
Cheers.
Pages
Saturday, January 21, 2012
Thursday, January 19, 2012
Practical Electrical
Whilst grinding with a running nose full of icky stuff, coughing and more icky stuff stuck in my ears, there is enough place for thinking and rethinking, like the revision of the electrical layout. The old loom being out, I found all the connectors needed in one place. (unfortunately I later found a small note on their site saying they only ship inside the UK, sent a mail to inquire, would be a pity). Even the ECU-connector and a practical junction box I want to use for the dashboard (shown in pic are: junction box, connectors for ECU, ignition-coil and crank sensor, multicore cable).
Well ok, back to grinding now, I want to start painting the chassis next weekend!
Cheers.
Well ok, back to grinding now, I want to start painting the chassis next weekend!
Cheers.
Monday, January 16, 2012
Friends
Good friends for some time now, orbital sender, grinder, dust mask and scotch brite all helping me to get rid of the old chassis paint. Quite a lot of work with every rail having four sides, some very bristling Sicaflex and a lot of inaccessible spots. A few more hours to go and I can start painting.
The chassis being completely stripped, there are new opportunities to fix all the things. The swirl pot will now find it's place in the engine compartment near the injection fuel pump, the low pressure (or lift-) pump will remain near the tank.
Cheers.
The chassis being completely stripped, there are new opportunities to fix all the things. The swirl pot will now find it's place in the engine compartment near the injection fuel pump, the low pressure (or lift-) pump will remain near the tank.
Cheers.
Thursday, January 5, 2012
Remote brake fluid reservoir
What? Well, that's the name. If the brake master cylinder has the reservoir not fitted directly to it's body, you are free to place and fix it where you want. When ordering the OBP pedalbox, I wasn't aware how big (and ugly) those reservoirs could be. Holding them in my hands, it was clear to me that I will never mount them into my car. Then a long surfing search began and I found above reservoirs in the U.S. of A. Order placed and curious to see how long it will take them to arrive here and what taxes they will add to the announced price. I added the plastic fantastic reservoir to compare. No poll needed.
Cheers.
Cheers.
Great craftsmanship
Temptation, temptation... this is fantastic handicraft. I don't really "need" anything from this company, but I'm very tempted. Pic is self-explaining! See more here: Axminster .
Cheers.
Cheers.
Friday, December 30, 2011
Chassis cleaning
With the pedalbox wandered to the floor, the brackets where the original pedals hung are not needed anymore. The cleaned chassis will allow an even surface underneath the steering column to fix a lot of things like the relay and fuse boxes, the ECU and others. This will add to the clean look I like to achieve when the new aluminium panels will be fitted. Removal ceremony with a lot of sparks...
Cheers.
Cheers.
Labels:
Chassis,
Chassis rail
Tuesday, December 27, 2011
Pedalbox bracket
It's a good feeling to start work. Ordering parts is great, dreaming of how it will look even better, but really working on it is best. And even better during Christmas holidays with my sons helping. After trial fitting the pedal box, we fabricated a bespoke bracket and MIG-welded it into the chassis (visible above the pedalbox). Those are not the only fixing points as the pedal forces have to be divided and spread.
Next task is grinding the whole chassis and painting it.
Cheers.
Next task is grinding the whole chassis and painting it.
Cheers.
Saturday, December 24, 2011
Unbent
Have a look at some pics of the repaired chassis sections (from top: front trapeze, backside of impact zone, lower wishbone mount). Two solid stands support it in a comfortable height to further work on. Next I will do some modifications. Brackets for the new pedal box will be welded in and maybe some more mountings for peripheral engine parts.
Cheers.
Cheers.
Labels:
Chassis,
Chassis rail
Luxembourg-Dartford-Luxembourg
3:00AM departure
7:45AM Calais P&O Ferry
8:15AM GB-time arrival in Dover
9:30AM Caterham@Dartford, parts ready to be picked, some more stuff added last minute
10:30 AM Christmas shopping in Maidstone
3:40 PM Dover
6:15 PM Calais (french time again)
9:45 PM back home
Parts collected in Dartford (GB) yesterday now followed by a day of rest. The rebuild will start next week with some more chassis mods, grinding and painting.
Merry Christmas and a Happy New Year!
7:45AM Calais P&O Ferry
8:15AM GB-time arrival in Dover
9:30AM Caterham@Dartford, parts ready to be picked, some more stuff added last minute
10:30 AM Christmas shopping in Maidstone
3:40 PM Dover
6:15 PM Calais (french time again)
9:45 PM back home
Parts collected in Dartford (GB) yesterday now followed by a day of rest. The rebuild will start next week with some more chassis mods, grinding and painting.
Merry Christmas and a Happy New Year!
Thursday, December 22, 2011
Restart
Back from the bench (or surgery in more human terms)! Not yet what you'd call a car, but a fair basis for a restart. Been born as a Westfield homologation car for Spain, built and assembled in Luxembourg, the last owner made it a pretty car with aluminium side panels rather than the plastic fantastic original body. This explains why it will wear a Caterham nose-cone and bonnet. To accomodate those parts, some mods have been made to the chassis and I will show them later on. This is done with the one and only goal: making it a prettier car, and not fooling anybody.
The ferry is booked for tomorrow morning. The Caterham parts are ready and waiting to be picked in Dartford (GB).
Cheers.
The ferry is booked for tomorrow morning. The Caterham parts are ready and waiting to be picked in Dartford (GB).
Cheers.
Labels:
Chassis,
Chassis rail
Monday, December 19, 2011
Steering 'n gearing
Some more stuff arrived today from Rallydesign (UK). The LHD (left hand drive) steering rack with quick ratio 2.4 turns, the gearlever relocation kit to have the gearlever 135mm moved backwards and a new gearlever to suit (items in pic are not scale). I also went to a hardware dealer and asked for aluminium panel prices. Never ever go to a DIY superstore, they just steal your money! 1mm x 2500mm x 1250mm for around 33.-€ taxes included. Now go to your local superstore and compare... Amazing!
Cheers.
Cheers.
Labels:
Extension Kit,
Steering
Monday, December 12, 2011
Weight watchers
The chassis is ready, but the mechanic wanted to trial fit the wishbones before handing it over. This is quite a professional approach and I'm happy I chose this company to straighten my frame. Meanwhile, my order from Westfield came in with the wishbones, hubs, uprights and the lower column (plus some smaller parts like rod ends a.o.). I assembled one hub plus disc brake plus upright (wheel carrier) to compare it with the old one both in bolt pattern and weight. The saving is quite big with 1.8kg saved per side (9.8kg old vs 8.0kg new). The discs are vented and grooved and 22mm wide, but I will not save weight on this item and kept them. Together with the HiSpec brake calipers, this is a weight saving of 4.8kg per side (unsprung weight). I wonder how much more I will save with the wheels when converting to 13", and I will report!
Left is new and shiny except for the disc:
The wishbones being wide track, they extend the front track by 100mm (50mm per side). Therefore, the rod ends have to be extended as well. Those extensions come with the wide track kit. I'm not very happy with this bolt on solution, but forum members tell me there's no reason for that.
Left is new and shiny except for the disc:
The wishbones being wide track, they extend the front track by 100mm (50mm per side). Therefore, the rod ends have to be extended as well. Those extensions come with the wide track kit. I'm not very happy with this bolt on solution, but forum members tell me there's no reason for that.
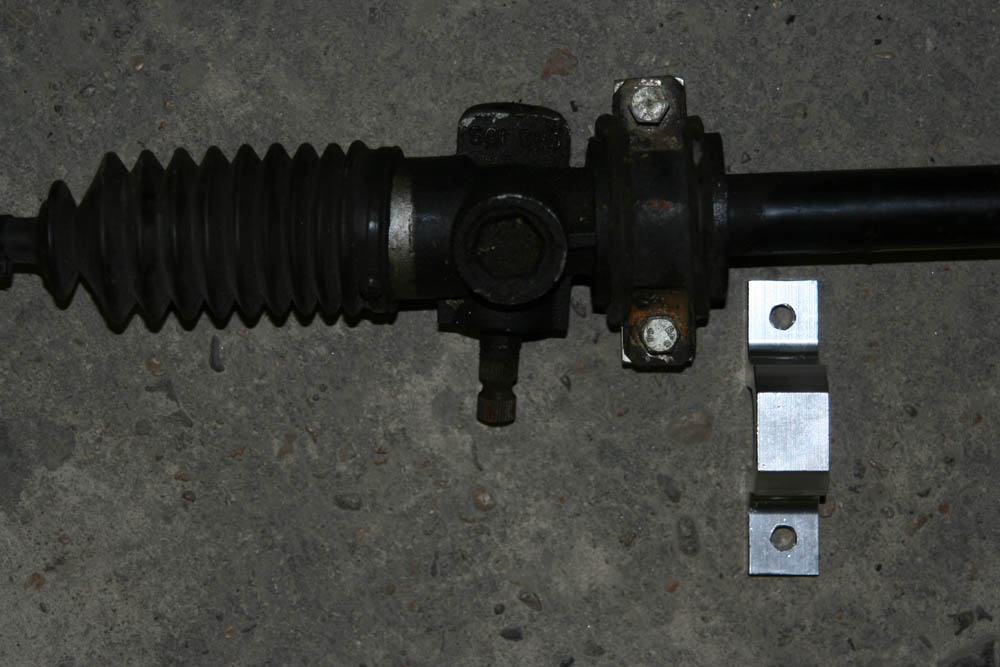
The steering rack brackets being old and a little rotten, I also ordered these nice aluminium brackets. Further examination showed a small crack in the left side knuckle and therefore I will replace the whole rack. Brakes and steering are safety relevant items and I will not save money there!
Two orders on hold now, one at rallydesign for a new steering rack, gear lever extension and gearlever, the other one at Caterham for the nose-cone, bonnet and radiator. Caterham? You thought it was a Westfield? Yes! You're perfectly right... more on this later.
Cheers.
Labels:
Hub,
Steering,
Upright,
Wheel Carrier
Wednesday, November 30, 2011
Car bench
Chassis is fixed on the car bench and looks almost ok. Some minor things to finish and it should be ready tomorrow. All the rails could be reused, some weldseams have been renewed. On one pic, the water level is visible. All in all, the chassis might even be straighter than when it came off the line at Westfield...
Cheers.
Labels:
Car Bench,
Chassis,
Chassis rail
Monday, November 28, 2011
Straight
The chassis is in good hands (hopefully). When loading it into the truck, it appeared how small and light it is. We fixed it with some lashing straps to shelves on wheels to easily manouevre it. At Carrosserie Palanca in Ehlerange (Luxembourg), they will check what exactly has to be done to straighten the frame. They call tomorrow for a quotation and delivery date.
Cheers.
Cheers.
Saturday, November 26, 2011
Roll out
Few last things to put out of the chassis. But one very big one. The typical Saturday afternoon job together with Max and Pit.
Lightweight explained with a live example:
Chassis ready for delivery:
It is planned to carry the chassis to a specialized company next Monday. They will submit a quotation and evaluate the overall condition of the chassis and the possible repair. Then it will be straightened and the rebuild can be started. This is not the end of the first half, but maybe only 10% of the whole work. The rebuilt will take a lot more time and effort. Wish me luck and perseverance!
Cheers.
Wednesday, November 23, 2011
Crane
Appointment fixed for next week to straighten the chassis, the engine and gearbox must come out. A motor crane is a good thing to do so and RC-Machines has this little thing amongst theirs products. It can lift a ton with the shortest jib and still 250kg with the longest, far enough for a small engine like mine even with the gearbox attached.
The motor positioner helps balancing the weight and allows to keep the engine straight. Putting it in situ I noticed that the carbs could be damaged. Five bolts lesser and they were out of the way. Everything is ready now but I wait for the weekend to have my sons with me to do the demount. I never did it, they never did it, so it will be great fun to do it together... learning by doing.
Cheers.
Labels:
Engine,
Engine Crane
Tuesday, November 22, 2011
Parts order #1
The fun part of this all is when you can pick up the phone, call the manufacturer of your car and order a lot of stuff. Just like Christmas... a little bit earlier. With weight saving on my mind, I ordered the uprights (wheel carrier) and the hubs made of aluminium. Plus all the small parts like nuts, washers, grease caps and a complete ball joint set and steering rack rod ends. And like you can see further down in an earlier thread, the wide track kit (X-mas offer 299.-£ instead of 457.-£).
The disease is called 'upgraditis' and when it hits you, you cannot stop with just replacing what is broken. Every part you take in your hand (and when stripping a car you hold EVERY part in your hand) you think about how you could replace it with a better, lighter or cleverer part. But I will try really hard not to exaggerate... well, we'll see ;-) Have a look at the pedal box I ordered yesterday:
Looks cool, doesn't it? I'm curious to see how it will fit the car as I have to convert from hanging pedals to a floor mounted box. This system has two separate brake cylinders for the front and rear brakes with a bias bar to set the ratio between the two axles. The clutch will remain cable-operated, but it could be upgraded to hydraulic as well.
Cheers.
Saturday, November 19, 2011
Ready for take-out
The KN Jupiter rims are mine! They have to get a polish before I use them, but for 27 year old aluminium rims, they look very much ok. Back to work after that because I'm still very far away from mounting wheels...
Have a look at this bracket:
I don't know if this is of legal requirement, but I know that without an angle grinder you cannot remove it, and then again you cannot remove the two lower bolts fixing the differential to the chassis. So next time I will take some more tools to the workshop to free the diff.
Have a look at this bracket:
I don't know if this is of legal requirement, but I know that without an angle grinder you cannot remove it, and then again you cannot remove the two lower bolts fixing the differential to the chassis. So next time I will take some more tools to the workshop to free the diff.
Chassis now free from
- brake lines
- pedal box
- inner panels
- handbrake
- gear lever
and engine detached ready to be taken out together with the gearbox.
Next move: buying the motor crane!
Cheers.
Thursday, November 17, 2011
KN Jupiter
A lot of thinking already goes into the rebuilt, and I mean A LOT OF THINKING. With some options to make it an even better car, I'm tempted to make it lighter, just as Colin Chapman would have done. There is the possibility of adding aluminium front uprights, aluminium hubs and lighter wheels. And with the car completely nude, it makes sense to do so right now. A first step might be above pictured rim. I will have a closer look at a set of four coming Saturday. They look like the original Caterham rims back in the eighties, namely KN Jupiter. The size is 6x13, so they are quite small (and light) compared to the now popular monster wheels. With tires 185 front and 205 rear, weight saving is around 20kg (4 wheels). I will weigh every part and compare with what was bolted to the car before to get a precise picture of what can be saved weight-wise.
Cheers.
Cheers.
Saturday, November 12, 2011
Three 's a crowd
A productive Saturday thanks to precious help from my sons.
Radiator and fan - out,
fuel-pump and filter - out,
rear panel - out,
rear suspension and half axles - out,
and finally (for today) loom - out... which is just a small wooden box full off cables, switches, relays and sensors. Not so easy to get it out, but most certainly a major headache to get everything in place again.
The rearside of the chassis almost empty now (except for the diff and brake lines).
The scuttle now bare of cables, panels and everything mounted like the coolant expansion tank.
Damage to the rails clearly visible, upper triangle and side rails.
Not that much left before the engine and gearbox can come out. Some inner panels, the brake and fuel lines, the oil cooler and maybe some smaller things I only will find out.
Cheers.
Radiator and fan - out,
fuel-pump and filter - out,
rear panel - out,
rear suspension and half axles - out,
and finally (for today) loom - out... which is just a small wooden box full off cables, switches, relays and sensors. Not so easy to get it out, but most certainly a major headache to get everything in place again.
The rearside of the chassis almost empty now (except for the diff and brake lines).
The scuttle now bare of cables, panels and everything mounted like the coolant expansion tank.
Damage to the rails clearly visible, upper triangle and side rails.
Not that much left before the engine and gearbox can come out. Some inner panels, the brake and fuel lines, the oil cooler and maybe some smaller things I only will find out.
Cheers.
Thursday, November 10, 2011
Short uncertainty
Although I haven't finished stripping the car (and still waiting for the insurance company to pay), I start to investigate for prices and availability of parts. When asking for new wishbones, a call at Westfield Sportscars made me uncertain whether they may still be available. After sending them all the details and a photo with measurements, the sales person double-checked with other staff members and confirmed they still are produced (pheeew...). They even have a special offer until Christmas for the wide track conversion (see below).
This kit adds 50mm of track width per side (for a total of 100mm) and it's price is even lower than what I would have to pay for the standard track wishbones. Decisions, decisions... I'm nervously looking forward to place that big order and wait for the goods to arrive. Well, patience is not really one of my virtues.
Cheers.
This kit adds 50mm of track width per side (for a total of 100mm) and it's price is even lower than what I would have to pay for the standard track wishbones. Decisions, decisions... I'm nervously looking forward to place that big order and wait for the goods to arrive. Well, patience is not really one of my virtues.
Cheers.
Labels:
Wide Track,
Wishbone
Wednesday, November 9, 2011
Dashboard out
Some more stripping done tonight, the dashboard and some other panels are out now. I labeled almost all of the cables which should be of help when I rebuild the car. The new loom will be custom made with all new cabling. Ripping out the pedal box was some work, especially getting the brake master cylinder and the clutch cable off.
More to come (off) next weekend.
Cheers.
More to come (off) next weekend.
Cheers.
Sunday, November 6, 2011
See-through
This morning the right side came off as well. First the front suspension, then the side panel. It's almost see-through with only some panels left. Two days off now to recover and plan further steps.
Cheers.
Cheers.
Saturday, November 5, 2011
Striptease
Some more dismantling made today. Quite a progress, although it is obvious that reassembling will not be as easy. One has to get into the logics of the builder when stripping the car. The alloy panels are very thin and can easily be damaged. That's why I started with the left panel already bent beyond repair.
Rear view with the tank removed:
Left side without panel, scuttle, windshield, exhaust and front suspension:
Rear view with the tank removed:
Left side without panel, scuttle, windshield, exhaust and front suspension:
Without the panel, the damage to the frame is now visible:
View of bent front rail, not very visible in this pic, but in real it got quite some strain.
Next time I work on the car, I will start to strip the right front suspension and the rear axle. If possible, I try to leave us much parts assembled as possible when removing. Then the right alloy panel will be removed very carefully as it is almost not damaged. Just a slight bent where the flasher was mounted. The dashboard will follow and then the engine compartment.
Cheers.
Subscribe to:
Posts (Atom)